HA-ESP32-S3 KIT
ESP32 Development Board Kit

Table of Contents
- Product Overview
- Hardware Components
- Power Management
- LED Indicators
- WiFi Configuration
- Chat Mode (Real-time Voice Interaction)
- Quick Start Guide
- Firmware Update
- Charging
- FAQ (Frequently Asked Questions)
Product Overview
The HA-ESP32-S3 KIT is a DIY development kit for building AI-powered voice interactive devices with real-time ChatGPT integration. This comprehensive kit enables makers and developers to create custom voice conversation systems with advanced AI capabilities.
🎯 Key Features
- Real-time ChatGPT Integration: Direct voice conversation with ChatGPT AI model
- Dual Microphone System: Enhanced voice capture and noise reduction
- WiFi Connectivity: Seamless cloud-based AI processing with ESP32-S3
- RGB LED Indicator: Visual feedback for device status
- DIY-Friendly Design: Easy to assemble and customize
- Auto Power-off: Intelligent power management with 10-minute auto-sleep
- OTA Firmware Updates: Over-the-air updates for continuous improvements
- Dual Button Controls: Power and Chat button for easy operation
Hardware Components
The HA-ESP32-S3 KIT features multiple physical components that work together to create a complete voice AI system:

Component Overview
| Component | Function |
|---|---|
| Charging Interface | USB-Type-C charging port for device power |
| Chat button | Controls real-time voice interaction mode with ChatGPT |
| Power button | Powers device on/off and triggers WiFi configuration mode |
| Microphone 1 | Primary voice input for audio capture |
| Microphone 2 | Primary voice input for audio capture |
| Three-color light | LED indicator providing visual feedback on device status |
Power Management
Power On/Off
| State | Trigger | Voice Feedback | LED Status |
|---|---|---|---|
| Power On | Long-press Power button (3s) | "Power on" | 🔵 Blue flashing (0.1s interval) |
| Power Off (Manual) | Long-press Power button (3s) | "Power off" | LED turns off |
| Power Off (Auto) | 10 minutes no activity | None | LED turns off |
| Standby | Device idle after power on | None | 🔵 Blue slow flashing (1s interval) |
LED Indicators
The RGB LED indicator provides real-time visual feedback on the device's operational status through different colors and flashing patterns.
LED Status Reference
| LED Status | Status | Meaning |
|---|---|---|
| 🔵 Blue (0.1s flashing) | Booting | Device is powering on |
| 🔵 Blue (0.3s flashing) | WiFi Config Mode | Ready to configure WiFi settings |
| 🔵 Blue (1s flashing) | Standby | Device idle, waiting for input |
| 🔴 Red (solid) | WiFi Disconnected | Failed to connect to WiFi network |
| ⚪ White (0.3s flashing) | Connecting | Establishing real-time voice connection |
| ⚪ White (solid) | Chat Active | Real-time voice interaction mode active |
| 🟢 Green (0.3s flashing) | OTA Update | Firmware update in progress |
WiFi Configuration
Before using the real-time voice interaction features, you must configure the device's WiFi connection to enable cloud-based ChatGPT AI processing.
Configuration Steps
Step 1: Enter WiFi Configuration Mode
- Power on the device (if not already on)
- Press the Power button 3 times quickly
- Listen for the WiFi configuration voice prompt
- LED Status: Blue light flashing at 0.3s intervals
Step 2: Connect to Device's Temporary WiFi
- On your computer or smartphone, open WiFi settings
- Look for a WiFi network named "HAESP32-XXXX" (XXXX represents device-specific numbers)
- Connect to this temporary WiFi network
- Your browser should automatically open the configuration page
- If not, manually navigate to: 192.168.4.1
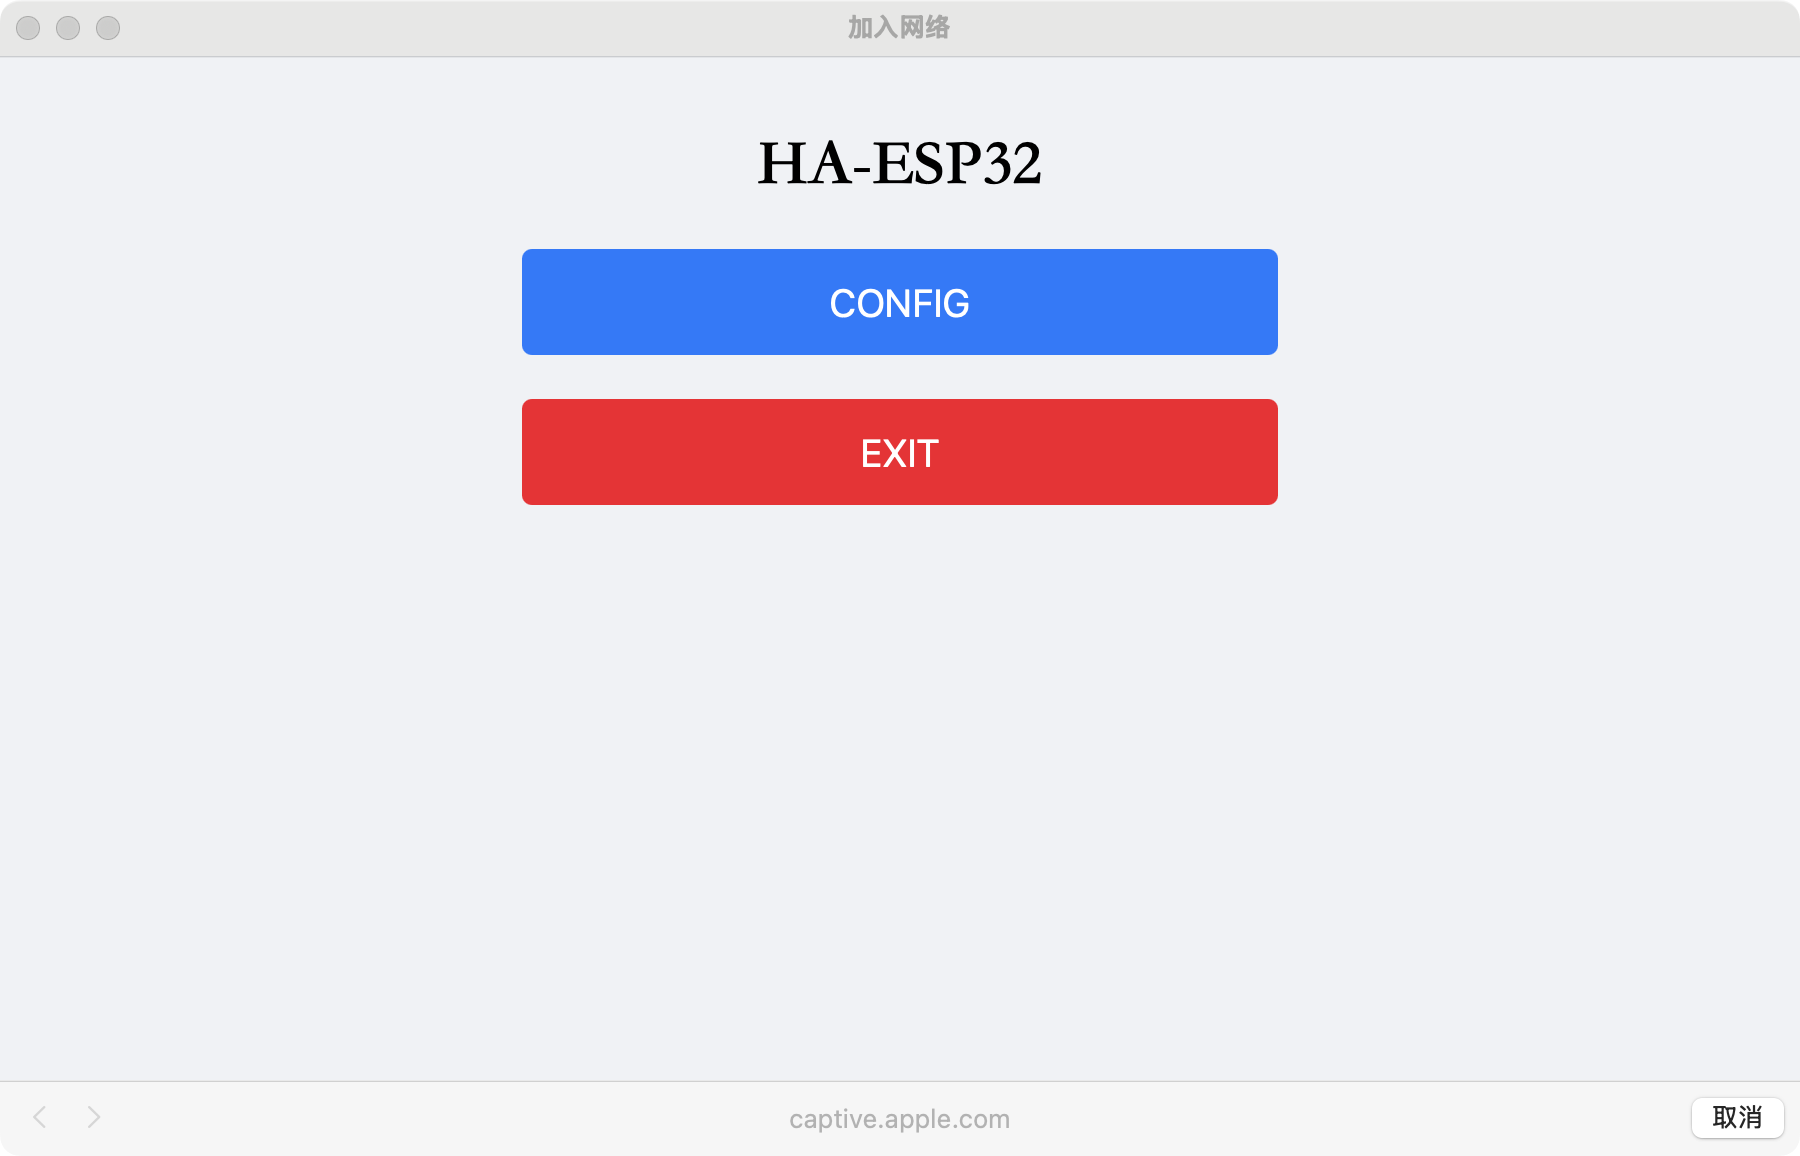
Step 3: Configure WiFi Settings
- Click the "CONFIG" button on the configuration page
- Enter your WiFi credentials:
- SSID: Your WiFi network name (e.g., "Hearit.AI")
- Password: Your WiFi password (e.g., "66668888")
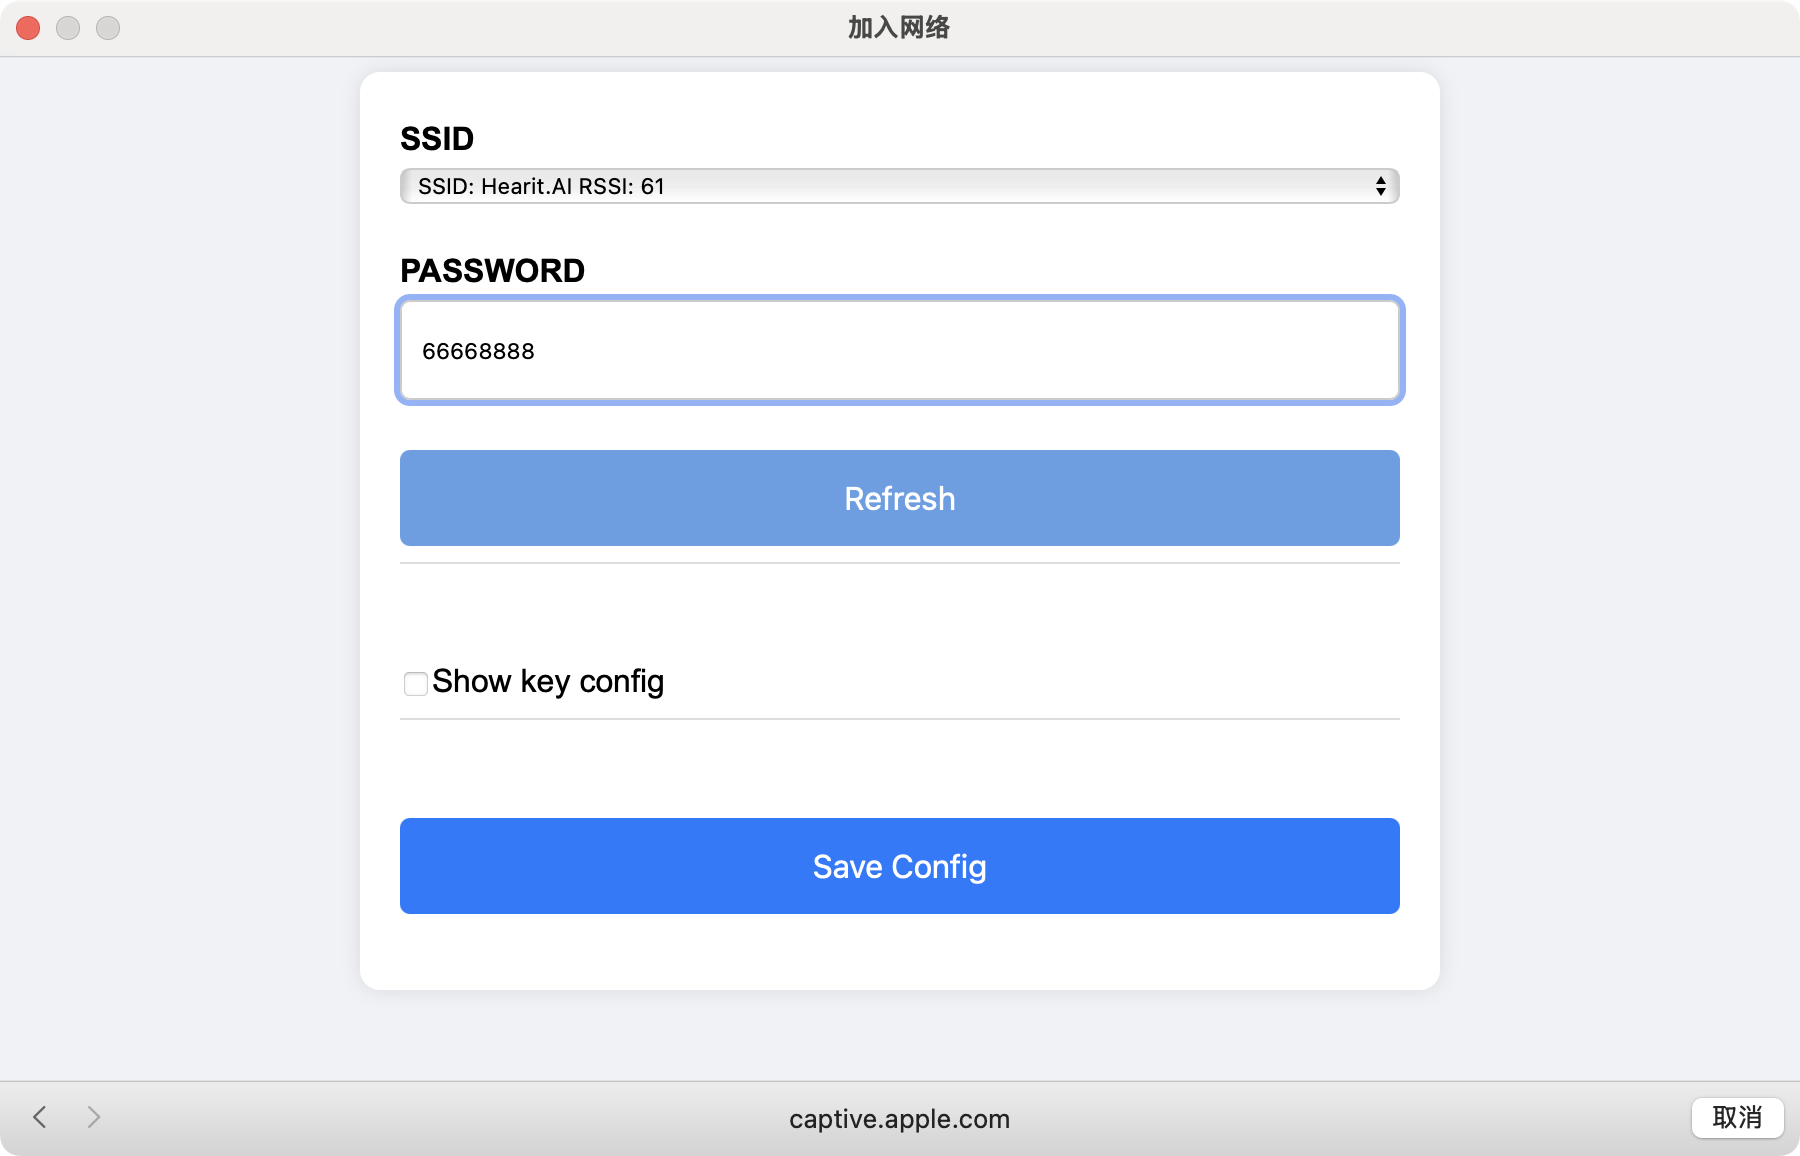
- Click "Save Config" to apply settings
Step 4: Exit Configuration Mode
After saving, the device will automatically:
- Exit WiFi configuration mode
- Attempt to connect to your specified WiFi network
- Return to standby mode (blue LED flashing at 1s intervals)
Alternative Exit Methods (if not configuring):
- Click the "EXIT" button on the configuration page
- Press the Power button 3 times again
- Wait 3 minutes without action (automatic timeout)
Chat Mode (Real-time Voice Interaction)
The Chat Mode enables real-time voice conversations with ChatGPT AI. This feature provides natural language interaction for questions, learning, and entertainment.
How to Use Chat Mode
Starting a Conversation
-
Ensure Device is Connected to WiFi:
- Device should show blue LED flashing slowly (1s intervals) in standby mode
- If red LED is solid, WiFi is not connected - reconfigure WiFi settings
-
Press the Chat button once:
- Device begins establishing connection to ChatGPT service
- Connection time: Approximately 8 seconds
- LED Status: White light flashing at 0.3s intervals
-
Wait for Connection:
- When connection is established, LED changes to solid white
- You'll hear a confirmation sound or tone
- Device is now ready for voice interaction
-
Start Talking:
- Speak naturally to the device
- ChatGPT will process your speech and respond with voice output through the speaker
- No need to press buttons while conversing
Ending a Conversation
Manual Exit:
- Press the Chat button once to exit chat mode
- Device returns to standby mode (blue LED, 1s flashing)
Automatic Exit:
- If there's no conversation for 1 minute, the device automatically exits chat mode
- Helps conserve battery and data usage
Chat Mode Status Overview
| Stage | Action | LED Status | Duration | Feedback |
|---|---|---|---|---|
| Idle | Device ready | 🔵 Blue (1s flashing) | - | Standby mode |
| Connecting | Press Chat button | ⚪ White (0.3s flashing) | ~8 seconds | Establishing connection |
| Active | Connection successful | ⚪ White (solid) | Until exit | Ready for conversation |
| Timeout | 1 min no activity | Returns to 🔵 blue | Automatic | Auto-exit |
Quick Start Guide
Get your HA-ESP32-S3 KIT up and running in minutes! Follow these simple steps to start chatting with ChatGPT.
📋 Complete Setup Flow
| Step | Action | LED Indicator | Voice Prompt | What's Happening |
|---|---|---|---|---|
| 1 | Long-press Power button (3s) | 🔵 Blue fast flashing (0.1s) | "Power on" | Device booting up |
| 2 | Wait for standby | 🔵 Blue slow flashing (1s) | None | Device ready |
| 3 | Press Power button 3 times quickly | 🔵 Blue medium flashing (0.3s) | WiFi config prompt | Entering WiFi setup mode |
| 4 | Connect to "HAESP32-XXXX" WiFi | 🔵 Blue medium flashing (0.3s) | None | Device broadcasting temp WiFi |
| 5 | Open browser, enter WiFi credentials | 🔵 Blue medium flashing (0.3s) | None | Configuring network |
| 6 | Save configuration | 🔵 Blue slow flashing (1s) | None | Connected to WiFi, standby |
| 7 | Press Chat button once | ⚪ White fast flashing (0.3s) | None | Connecting to ChatGPT (~8s) |
| 8 | Wait for connection | ⚪ White solid | Confirmation tone | Ready for conversation! |
| 9 | Speak naturally | ⚪ White solid | AI responses | Chatting with ChatGPT |
| 10 | Long-press Power button (3s) | LED turns off | "Power off" | Device shutting down |
🚀 Step-by-Step Instructions
Step 1: Power On the Device
- Action: Long-press the Power button for 3 seconds
- LED: Blue light flashing rapidly (0.1s intervals)
- Voice: Hear "Power on"
- Status: Device is booting
Step 2: Wait for Standby Mode
- LED: Blue light flashing slowly (1s intervals)
- Status: Device ready for WiFi configuration
Step 3: Enter WiFi Configuration Mode
- Action: Quickly press the Power button 3 times
- LED: Blue light flashing at medium speed (0.3s intervals)
- Voice: WiFi configuration prompt
- Status: Device is ready to be configured
Step 4: Connect to Device's Temporary WiFi
- Action: On your phone/computer, connect to WiFi named "HAESP32-XXXX"
- LED: Still blue flashing (0.3s)
- Status: Configuration portal active
Step 5: Configure Your WiFi
- Action:
- Browser opens automatically (or go to 192.168.4.1)
- Click "CONFIG" button
- Enter your WiFi name (SSID) and password
- Click "Save Config"
- LED: Blue flashing continues during setup
- Status: Saving WiFi credentials
Step 6: Configuration Complete
- LED: Blue light flashing slowly (1s intervals)
- Status: Device connected to your WiFi, in standby mode
- Note: If LED shows red (solid), WiFi connection failed - retry configuration
Step 7: Start Chat Mode
- Action: Press the Chat button once
- LED: White light flashing (0.3s intervals)
- Status: Connecting to ChatGPT service (takes ~8 seconds)
Step 8: Begin Conversation
- LED: White light solid (constant)
- Voice: Confirmation tone or sound
- Status: ChatGPT is ready!
- Action: Start speaking naturally to the device
Step 9: Enjoy Your Conversation
- LED: White light remains solid during conversation
- Status: ChatGPT processes your speech and responds with voice through the speaker
- Tips:
- Speak clearly and naturally
- Wait for AI to finish responding before speaking again
- No need to press buttons while talking
Step 10: Power Off (When Finished)
- Action: Long-press the Power button for 3 seconds
- LED: LED turns off
- Voice: Hear "Power off"
- Status: Device shut down
- Note: Device auto-powers off after 10 minutes of inactivity
💡 Quick Tips
- First-time Setup: WiFi configuration only needs to be done once
- Next Time: Just power on → press Chat button → start talking!
- Auto Exit: Chat mode exits automatically after 1 minute of silence
- Manual Exit: Press Chat button once to exit chat mode anytime
- Battery: Charge using USB Type-C cable (5V/2A)
- DIY Customization: The kit can be customized with different enclosures and configurations
6. Firmware
For detailed firmware update instructions and methods, please visit the dedicated firmware update page:
👉 View Firmware Update Guide for HA-ESP32-S3 KIT
Charging��
Proper charging ensures optimal device performance and battery longevity.
Charging Specifications
- Charging Cable: USB Type-C
- Charging Voltage: 5V / 2A
- Battery Type: 18650 Rechargeable Lithium Battery
- Charging Port: USB Type-C port on the device
How to Charge
- Connect USB Type-C cable to the device's charging port
- Connect the other end to a 5V/2A power adapter or USB port
- LED Indicator: Check for charging status indication
- Allow device to charge fully before first use
- Charging time: Approximately 1.5 hours for full charge
FAQ (Frequently Asked Questions)
General Operation
-
How do I turn on the device?
Long-press the Power button for 3 seconds. You'll hear "Power on" and see blue LED flashing.
-
How do I turn off the device?
Long-press the Power button for 3 seconds. You'll hear "Power off" and the LED will turn off.
-
Why does my device turn off automatically?
The device has an auto power-off feature that activates after 10 minutes of inactivity to save battery.
-
What do the different LED colors mean?
- Blue: Boot, WiFi config, or standby modes
- Red: WiFi connection failure
- White: Chat mode (flashing = connecting, solid = active)
- Green: Firmware update in progress
WiFi Configuration
-
How do I configure WiFi settings?
Press the Power button 3 times quickly, connect to "HAESP32-XXXX" WiFi, and use the configuration page to enter your WiFi credentials.
-
Why can't I find the "HAESP32-XXXX" WiFi network?
- Ensure you pressed the Power button 3 times quickly
- Listen for the WiFi configuration voice prompt
- Check that the blue LED is flashing at 0.3s intervals
- Try restarting the device and entering config mode again
-
The LED shows red solid - what does this mean?
Red solid LED indicates WiFi connection failure. Re-enter WiFi configuration mode and verify your SSID and password are correct.
Chat Mode
-
How do I start a conversation with ChatGPT?
Press the Chat button once. Wait for the white LED to become solid (about 8 seconds), then start speaking.
-
How do I exit Chat Mode?
Press the Chat button once to manually exit, or wait 1 minute without speaking for automatic exit.
Firmware Updates
-
How do I update the firmware?
Firmware updates are automatic. When you power on the device, it checks for updates automatically and will announce "Upgrading the system" if an update is available.
-
How long does a firmware update take?
Approximately 2 minutes. The green LED will flash during the update process.
-
What if the update fails?
Restart the device by powering it off and on. It will check for updates again. If problems persist, ensure WiFi connection is stable.
DIY & Hardware
-
Can I customize the hardware components?
Yes! The HA-ESP32-S3 KIT is designed for DIY customization. You can modify the enclosure, add additional sensors, or integrate it into your own projects.
-
Can I reprogram the ESP32-S3?
Yes, the ESP32-S3 can be reprogrammed via the USB Type-C port. However, custom firmware may affect the ChatGPT integration features.